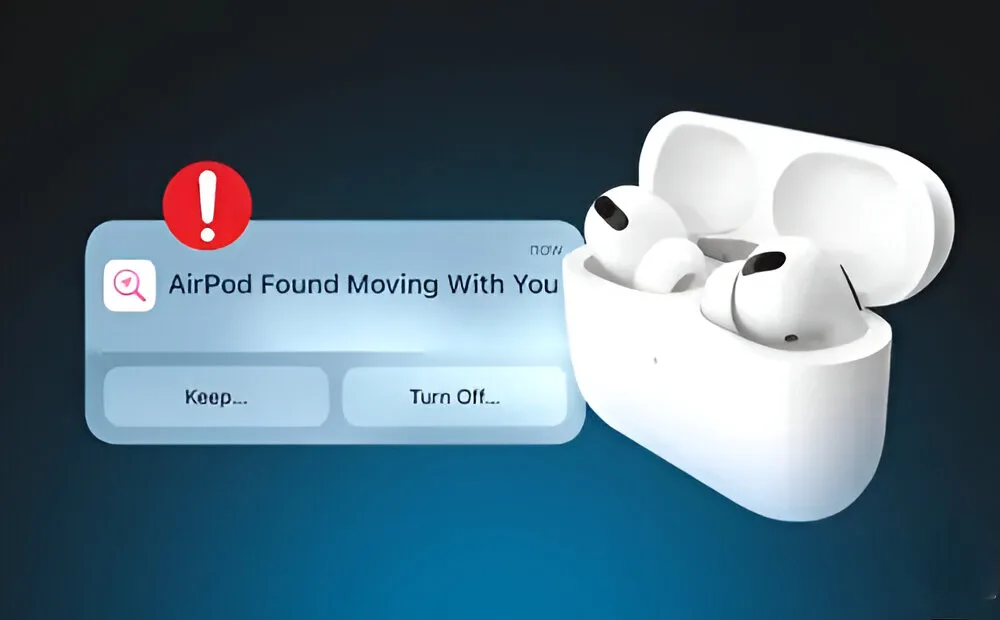
Apple’s Find My app offers a handy feature to locate lost or stolen AirPods, but it also raises privacy and tracking concerns. Misuse could allow someone to surreptitiously track your location by placing AirPods near you. Additionally, you might receive “AirPods found moving with you” alerts from your own AirPods, as I have when using my sibling’s pair. If you’re concerned about being tracked by AirPods, we’ll explain how to disable these notifications on your iPhone.
What are “AirPods Found Moving With You” and “AirPods Detected Near You” Alerts?
The Find My app extends beyond just AirPods, helping you locate various Apple devices and items with attached AirTags. While this tracking ability is beneficial, it also raises privacy issues. Unfortunately, some individuals use AirPods and AirTags for unauthorized tracking, despite it being illegal and unethical.
Apple has introduced a solution to maintain privacy and prevent unwanted tracking. If an AirTag, AirPods, or other Find My network accessory gets separated from its owner and is detected moving with you, you’ll receive notifications on your device. There are two types of notifications:
1. AirPods detected near you: This notification occurs when Find My detects an unknown AirPods device near you in the same location for a period of time.
2. AirPods found moving with you: This notification happens when Find My detects an unknown pair of AirPods that are moving in the same direction and location as you for an extended period.
7 Ways to Disable AirPods Found Moving With You Alerts
If you receive an alert that AirPods are moving with you but you don’t own any, there’s no need to panic. It doesn’t necessarily mean someone is tracking you. Sometimes, your iPhone may detect nearby AirPods, such as those owned by a friend, family member, or roommate. However, you should still pay attention to such alerts.
There are also instances where you might receive “AirPods Detected” notifications, even if the AirPods belong to you or someone you know. This typically occurs when the AirPods are connected to a different Apple ID. To disable these alerts, you can try the following.
Method 1: Play a Sound on AirPods
If you receive the “AirPods found moving with you” alert, your first step should be to attempt to locate the AirPods. In the Find My app, you can check if you can play a sound on the unknown AirPods. Here’s how:
1. Tap on the “AirPods Found Moving With You” alert.
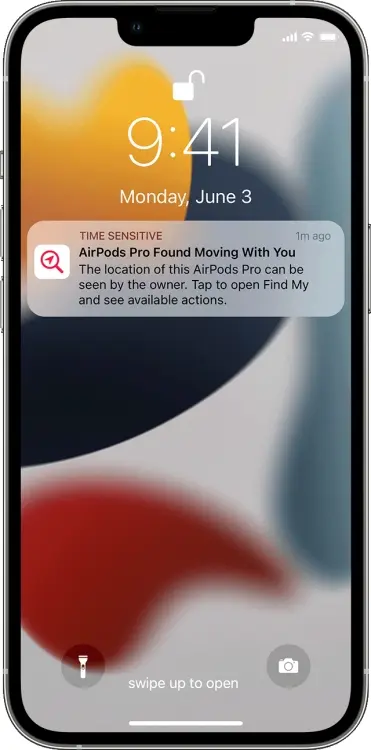
2. Tap on the Continue button, then tap on Play Sound.
3. Listen for the sound. You can play it again if you need more time to find the AirPods.
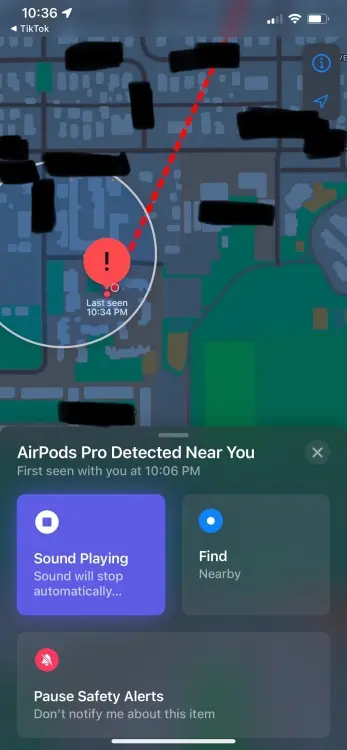
If the option to play a sound is unavailable, the AirPods may not be with you. If the accessory was with you overnight, its identifier might have changed. The Find My app uses this identifier to determine if it’s the same item moving with you. If the item is now within range of the owner, you cannot play a sound.
Method 2: Identify the owner of AirPods
Another step you can take is to try to identify the owner of the AirPods using the Find My app. If the owner has marked the item as lost, the app will provide more information about the owner. Here’s what you can do:
1. Open the Find My app and tap on Items.
2. Tap on Identify Found Item.

3. If the AirPods are marked as lost by the owner, there will be a message and information to help you contact the owner.
If the AirPods belong to your friend or roommate, you can ask them to reconnect them to their iPhone or iPad. Once they do this, the “AirPods Found Moving With You” notifications should stop.
Method 3: Disable AirPods
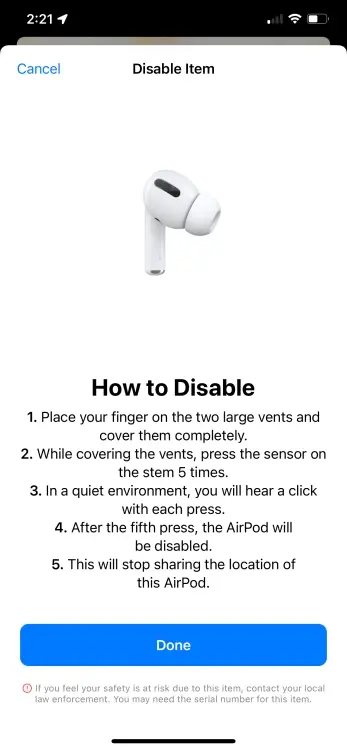
Sometimes, you may find AirPods that do not belong to anyone you know. In such cases, you can try to disable them to prevent the owner from tracking your location. Here’s how:
1. Tap on the notification.
2. Scroll down to the bottom and tap on Instructions to Disable them.
3. Follow the on-screen instructions.
Method 4: Disable Location Sharing
If you want to stop AirPods tracking notifications completely, you can disable location services on your iPhone. When you turn off location sharing, the Find My app won’t have access to your precise location. This action will stop the notifications and prevent authorized contacts from tracking you.
Keep in mind, though, that by disabling location sharing, you won’t be able to use the Find My app to locate your AirPods if you lose them. Here’s how to do it:
1. Go to Settings on your iPhone.
2. Tap on Privacy & Security, then tap on Location Services.
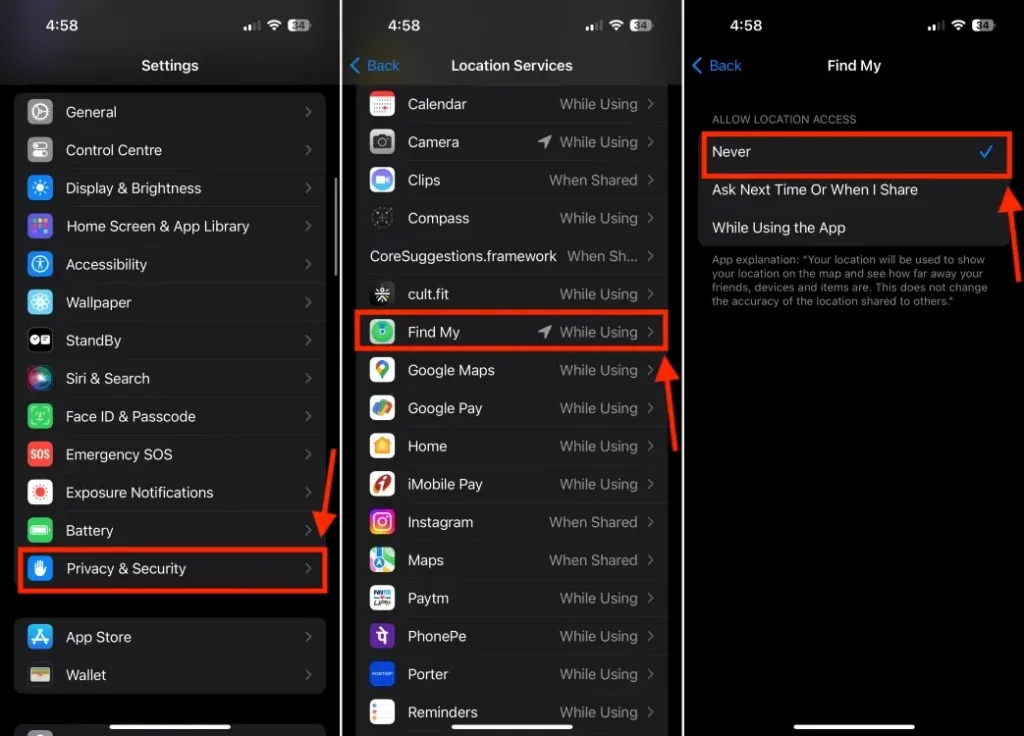
3. Scroll down and tap on Find My and set the location access to Never.
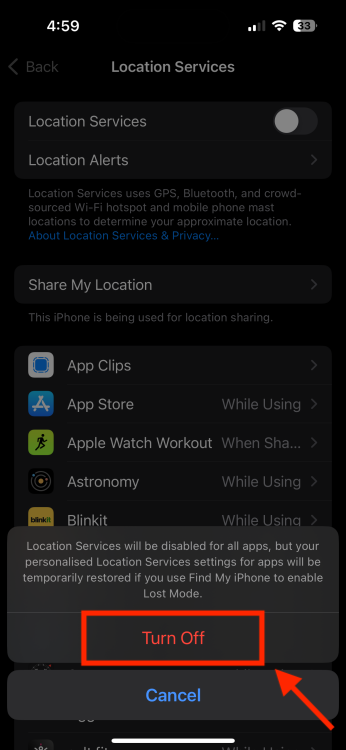
4. If you want to disable location services entirely, you can turn off the Location Services toggle at the top of the screen, then tap the Turn Off button to confirm.
Method 5: Turn off “Notify When Left Behind”
Another way to disable AirPods tracking is by turning off the “Notify When Left Behind” feature in the Find My app. This feature sends alerts when your AirPods are not with you, which can be useful for those who often forget things while traveling but may become annoying. If you want to stop tracking on your AirPods, you can disable this feature. Here’s how:
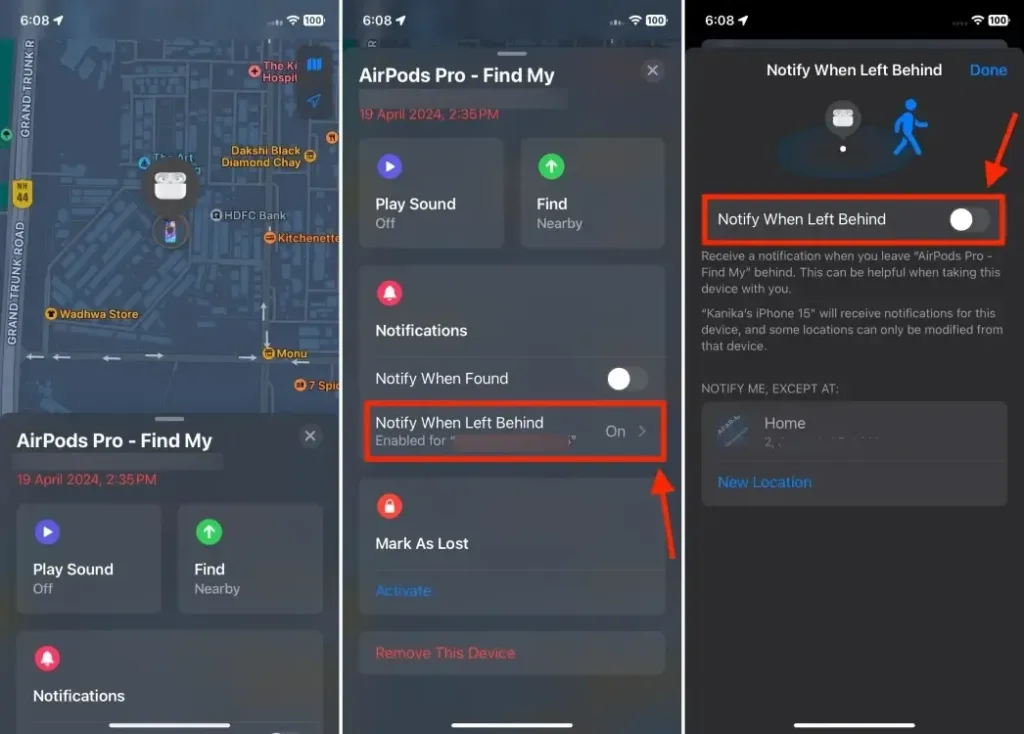
1. Open the Find My app on your iPhone and go to the Devices tab at the bottom.
2. Select your AirPods and swipe up to see the settings.
3. Under Notifications, tap on Notify When Left Behind and toggle it off.
4. Tap Done to save the changes.
Sometimes, you may receive “AirPods detected” alerts even if the AirPods belong to you or a close family member. If you’ve borrowed someone else’s AirPods, you can turn off alerts for that item. Tap on the alert and select Pause Safety Alerts.
Method 6: Enable Family Sharing
If this happens frequently, you can try the methods below to disable “AirPods Found Moving With You” or “AirPods detected” notifications. Living under the same roof can result in receiving notifications and alerts for other family members’ devices, such as AirPods or AirTags.
You can prevent these alerts by identifying all these devices as familiar, rather than lost or unknown items. To do this, you need to enable Family Sharing. Here’s how to enable Family Sharing on your iPhone or iPad:
1. Open the Settings app and tap on your Apple ID card.
2. Tap on Family Sharing and then tap Continue.
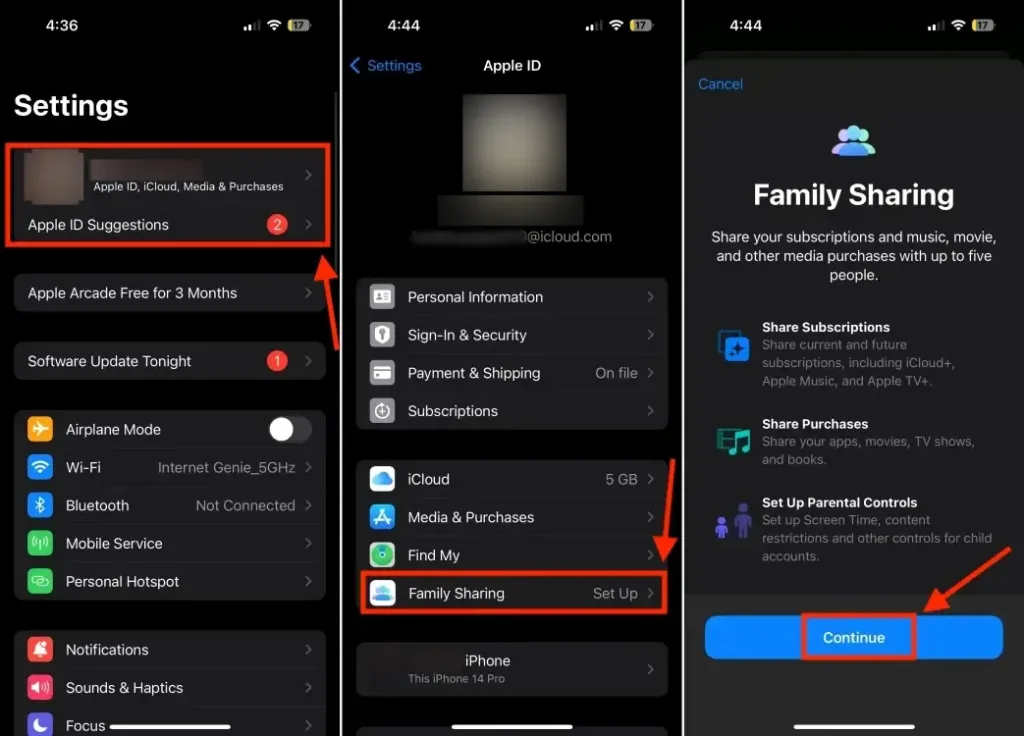
3. Follow the on-screen instructions to invite family members. To add nearby devices, tap on AirDrop.
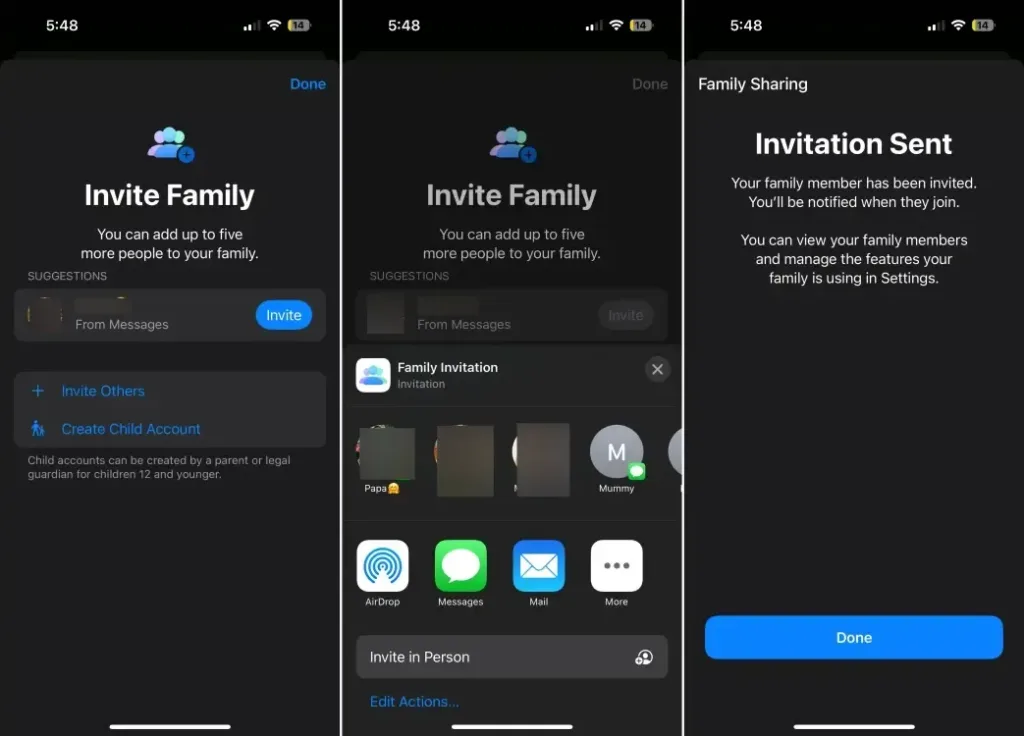
4. Once you’ve completed these steps, your contacts will receive an invitation. Upon acceptance, they will be added to the family group.
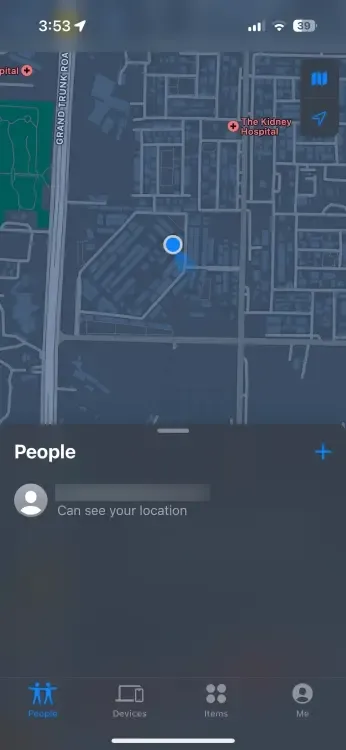
5. To verify, go to Find My > People and check if your family members and their devices are added.
Method 7: Reset your AirPods
Resetting your AirPods can be a comprehensive solution to address various issues with your earbuds, such as firmware or connectivity issues, or persistent “AirPods detected” notifications. However, you can only perform this action if you have access to the AirPods; you can’t reset an unknown accessory that’s not available. Here’s how to reset your AirPods:
1. Go to Settings > Bluetooth and tap on the “i” icon next to the AirPods name.
2. Scroll down to the bottom, tap on Forget This Device, and confirm by tapping Forget Device.
3. Once you’ve completed these steps, you can pair your AirPods with your iPhone or iPad again.
This is how you can disable AirPods notifications and resolve some common issues with your earbuds. If you have any other tips or questions, feel free to share them in the comments below!


