There are various instances when you might want to convert a photo into a PDF on an iPhone or iPad. Whether you need to consolidate important images into a single file for paperwork or wish to annotate and collaborate on document images, the process is quite straightforward. In this article, we’ll explore six ways to convert photos to PDF on iPhone and iPad. Whether you’re looking to turn a single image into a portable document or convert multiple pictures into a single PDF, the methods outlined below will cater to your needs.
Method 1. Using Print Option
The built-in Print option in the Photos app provides a simple method to convert photos to PDF on an iPhone without the need for an additional app. This feature seamlessly transforms photos into PDFs on your iPhone or iPad before sending them to the printer. Here’s a step-by-step guide on how to use this option to instantly convert multiple pictures into a PDF on your iPhone:
- Open the Photos app on your device and select the image you want to convert to a PDF document.
- Tap on the Share button located at the bottom left corner and choose Print from the share sheet.

- Pinch out (using your fingers) on the photo preview to convert the image into a PDF file. It’s as simple as that!
- Once the image has been converted, you can tap on the Share button again to share it via iMessage, save it to your iCloud or iPhone, or transfer it to another app based on your preferences.

Method 2: Using Files App
The Apple Files app provides a convenient method for effortlessly converting an image into a PDF document. However, there’s a catch: this method is applicable only if the required photos are saved in the Files app. Unfortunately, direct access to your Photos library is not possible via the Files app.
You can readily access all your downloaded images, iPhone screenshots, downloaded images, iCloud photos, and other images you’ve directly saved to the Files app. If you want to create a PDF using a photo from the Photo library, you must first copy the images from Photos to the Files app. Here are the detailed steps:
- Open the Photos app on your iPhone or iPad and navigate to the image you want to convert into a PDF file. Select the image and tap the Share button at the bottom left corner. If you’re looking to convert multiple images into a portable document format, tap Select at the top-right and choose the images.
- In the share sheet, select the ‘Save to Files’ option, choose your preferred location, and tap the Save button.

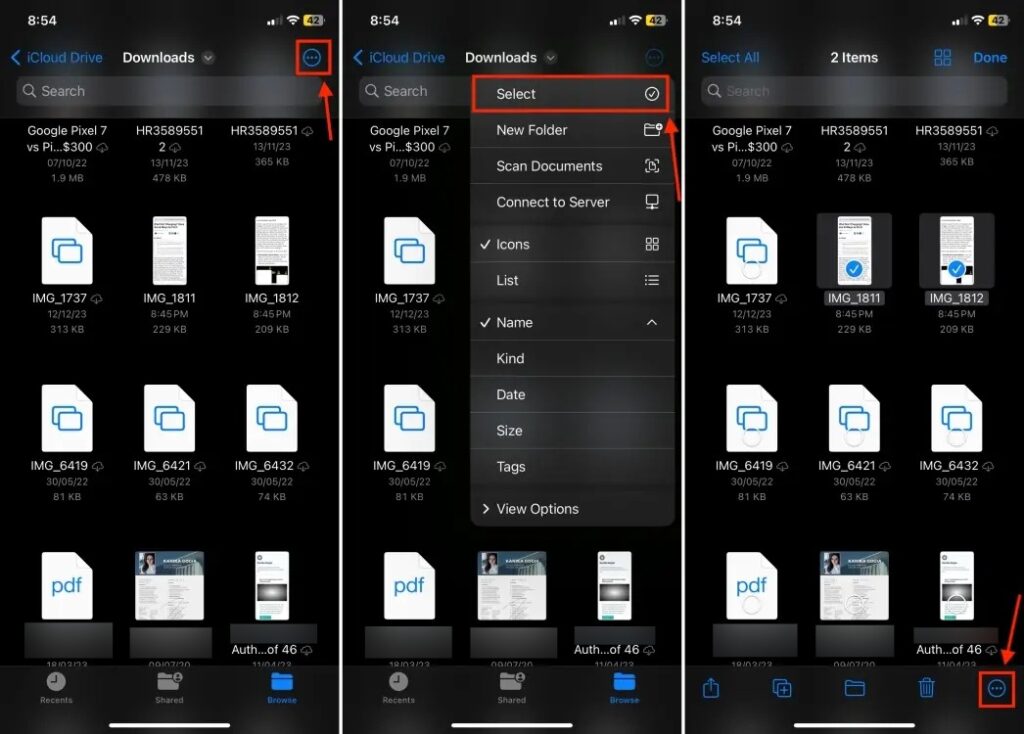
- Now that you have the desired images in the Files app, select the image you want to turn into a PDF. If you want to convert multiple images into PDFs simultaneously, tap the three-dot menu button at the top right. Next, opt for “Select” and choose all the images you intend to convert into a PDF file.
- Once you’ve selected the images, tap the three-dot ‘More’ button at the bottom right corner of the screen.
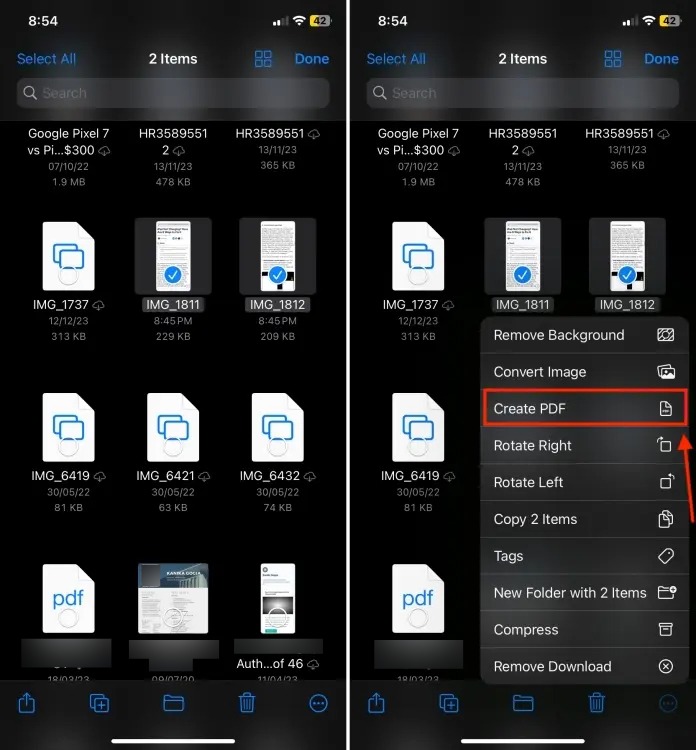
- From the list, choose the Create PDF option in the context menu. The PDF will be stored in the same location within the Files app.
- If you want to further edit or annotate your pictures, consider exploring the best PDF editor apps available.
Method 3: Using Apple Books App
An alternative method to convert any picture into a PDF file is by using the Apple Books app. This process is quick and straightforward – all you need to do is save the images. By copying your photos to the Books app, they are automatically transformed into PDFs on your iPhone or iPad. Whether you want to convert a single picture into a PDF or save multiple photos as a single PDF file, the app works seamlessly. Here’s a step-by-step guide:
- Open the Photos app on your iPhone and select the image(s) you want to convert into a PDF.
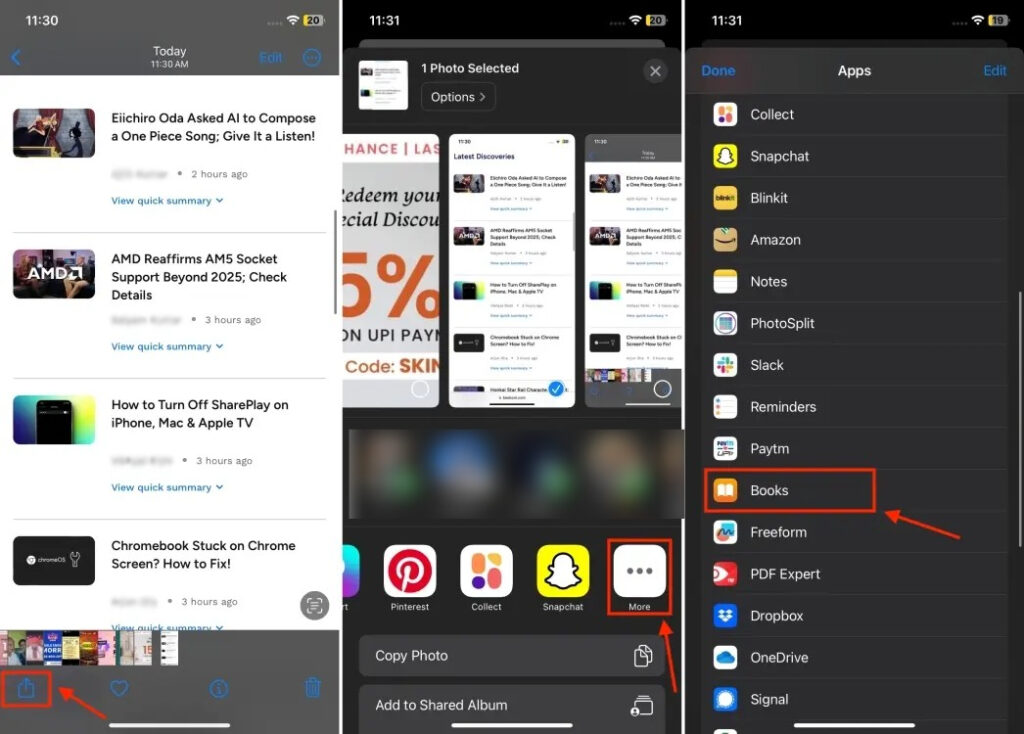
- Tap on the Share button at the bottom-left of the screen and select the Books app.
- If you don’t see the Books option, tap on the More button (three dots), swipe through the list, and choose Books.
- That’s it! The images will be transformed into PDF files and will open automatically in the Apple Books app. Simple, isn’t it?
- You can further edit the PDF or share it via Messages, AirDrop, or the Mail app on your iPhone.

Method 4: Using Shortcuts App
Creating a shortcut on your iPhone can save you time if you frequently need to convert pictures into PDFs. While setting up iOS shortcuts may seem a bit tedious initially, it’s a straightforward process. Here’s how you can save photos as a PDF on an iPhone using a shortcut:
- Open the Shortcuts app on your iOS device and tap on the “+” icon at the top-right.
- The shortcut will be initially named “New Shortcut 1”. It’s recommended to rename it for easy identification later on.
- To rename, tap on the small downward-facing arrow next to the name, and select the Rename option. Choose a preferred name; for example, “Convert Photos to PDF”.
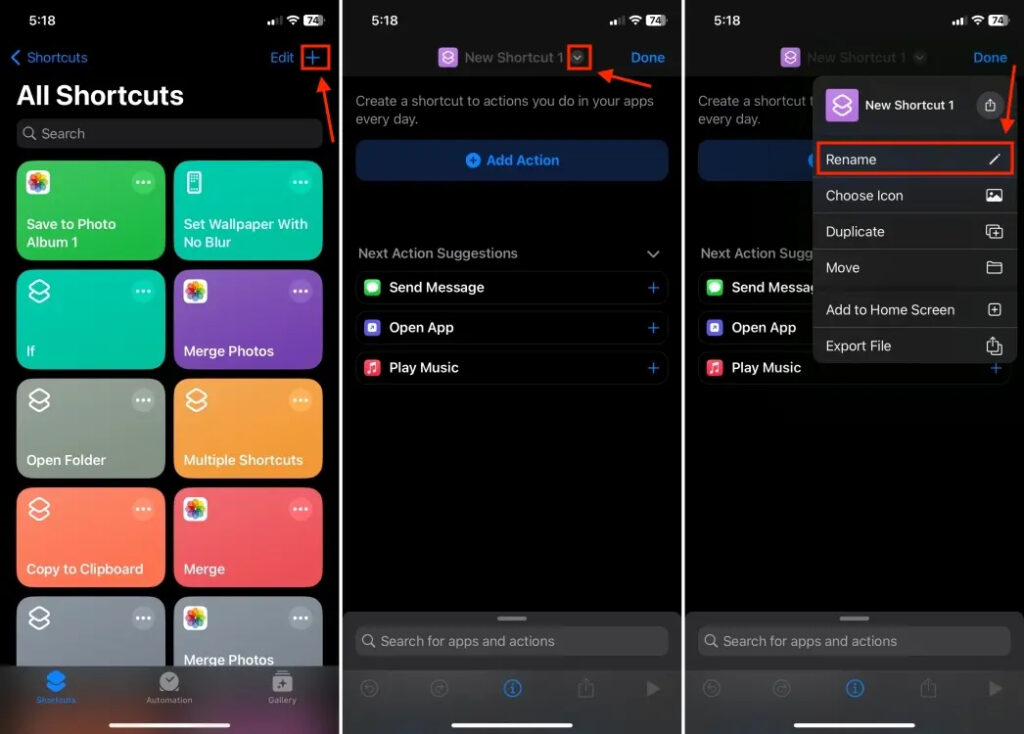
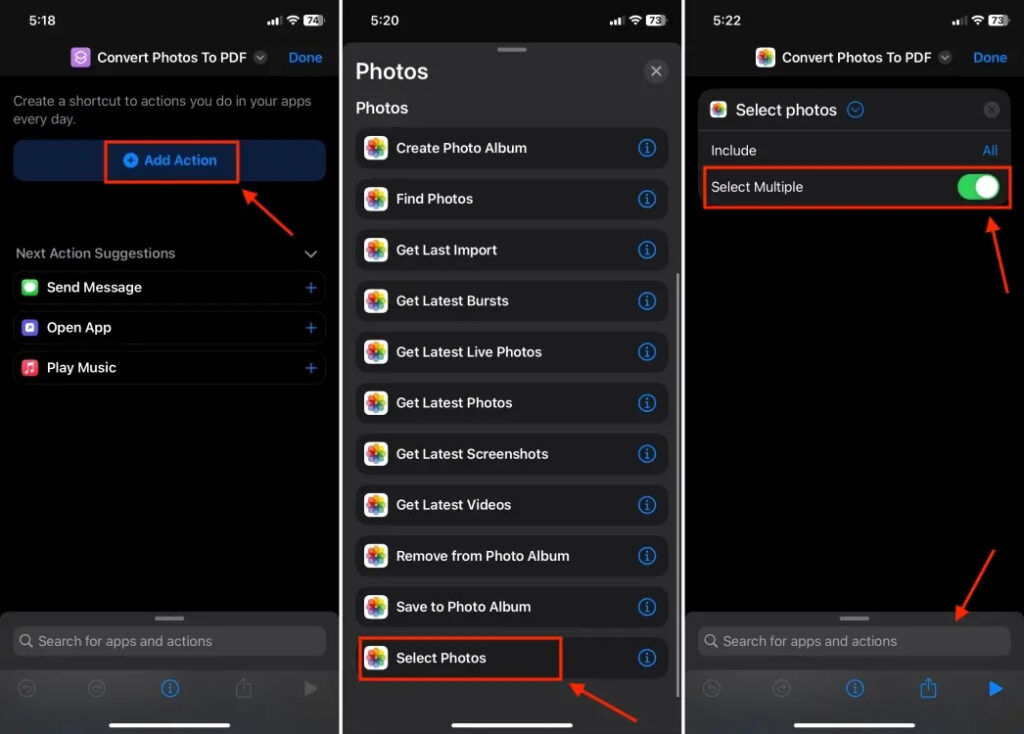
- Tap on the “Add Action” button.
- Type “photos” in the search bar and select the Photos app. Then, tap on “Select Photos“.
- Tap on the small arrow next to “Select Photos” and enable the “Select Multiple” toggle.
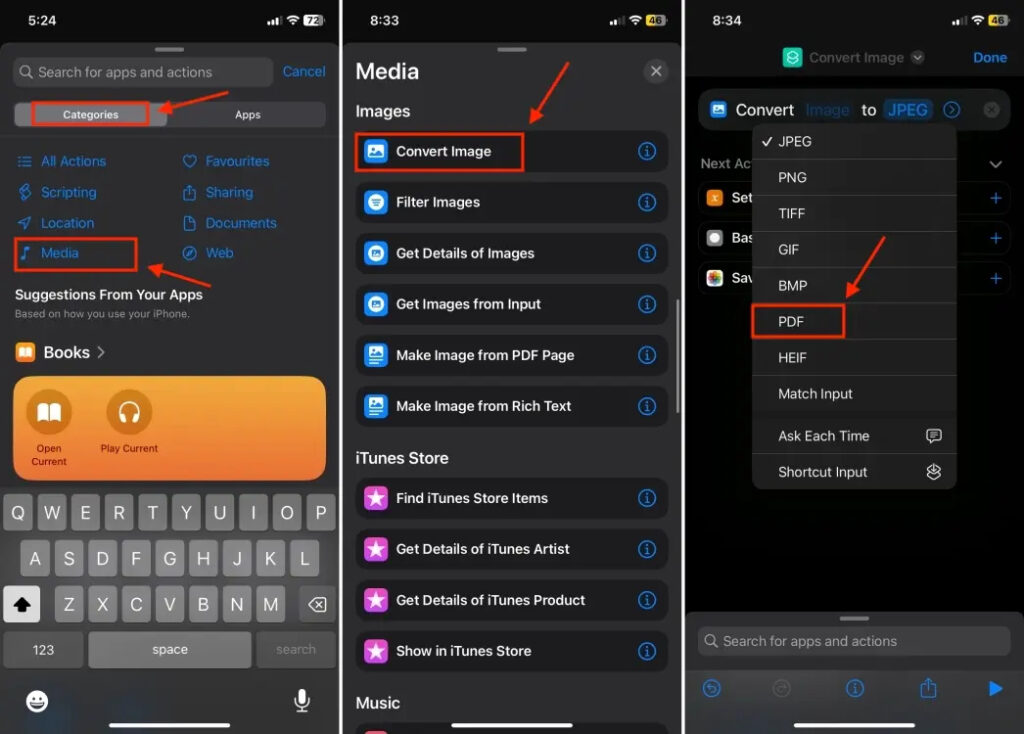
- Tap on the search bar at the bottom, select “Categories“.
- Tap on “Media“, scroll through the list, and choose the “Convert Image” option.
- Tap on “JPEG” and select “PDF” from the list.
- Once again, tap on the search bar, then tap on “Apps“, and select “Files“. Choose the “Save File” option from the list and tap on “Done” at the top-right corner.
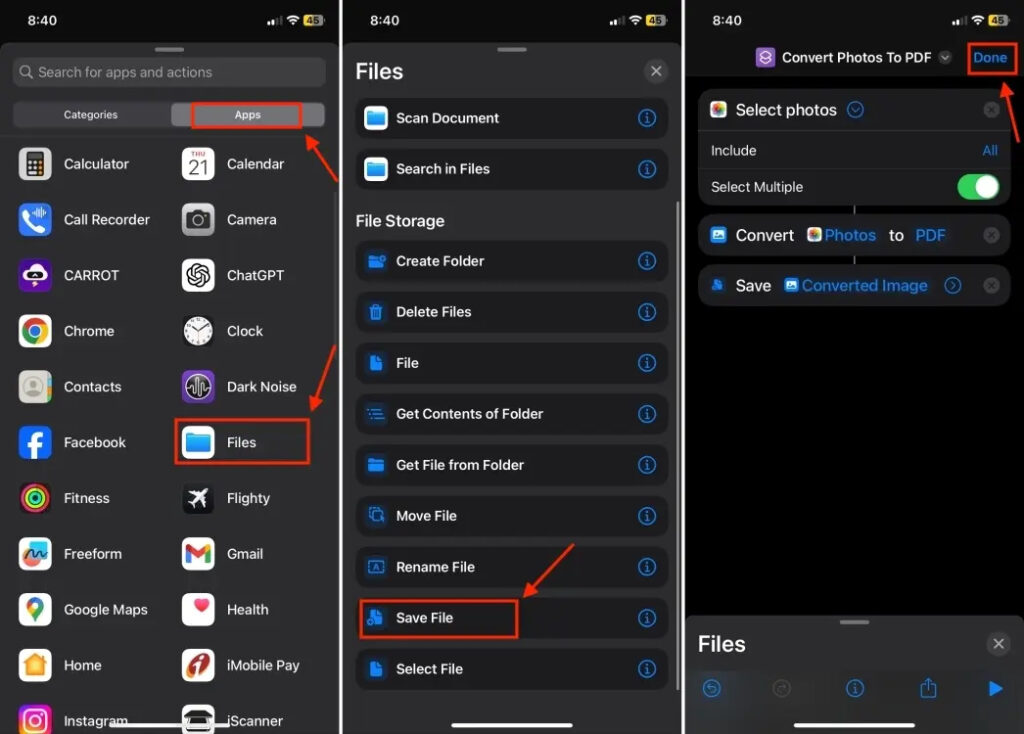
To run this shortcut, open the Shortcuts app and tap on the shortcut you’ve created. This will open the Photos app, allowing you to select the images you want to save as a PDF. Tap on “Add“, then choose the location where you want to save the PDF file, and tap on “Open“.
Method 5: Using Third-Party Apps
Another method to convert a photo into a PDF on an iPhone is by using a dedicated app. Besides the built-in options, third-party image-to-PDF converter apps provide an efficient way to transform photos into PDF files on iOS. After testing a few options, here are some free image-to-PDF converters available on the App Store that can seamlessly turn images into PDF documents on iPhone and iPad:
- Photo to PDF Converter Scanner (Free)
- PDF Converter- Reader for PDF (Free)
- Photos PDF (Free, in-app purchases)
Method 6: Using Online Converters
If you prefer not to create shortcuts or download additional apps, using online converters in any browser is a convenient option. Numerous websites allow you to convert JPG images to PDF for free on iPhone. One recommended choice is Adobe Acrobat’s free image-to-PDF converter, supporting the conversion of JPG, PNG, GIF, and other files into PDF format at no cost.
That covers various methods for converting photos into PDF files on iPhone and iPad. There are built-in options as well as third-party image-to-PDF converters that offer additional features. Whether you opt for the default options or choose a third-party converter, each method provides a simple and effective way to accomplish the task. Feel free to share your favorite method or any additional tips in the comments below.


I do not even know how I ended up here but I thought this post was great I do not know who you are but certainly youre going to a famous blogger if you are not already Cheers