Adjusting the brightness is one of the most basic tasks you can perform on Windows. If you’re new to the operating system, you may not be familiar with how to change the brightness on Windows 10. Fortunately, there are several methods available to increase or decrease the brightness, and in this guide, we’ll explore all of them. So, continue reading until the end to learn all the possible ways.
Method 1: Changing Brightness from Windows Settings
One of the simplest ways to adjust the brightness on Windows 10, particularly on portable devices like laptops and tablets, is by using the Settings app. Here’s how you can do it:
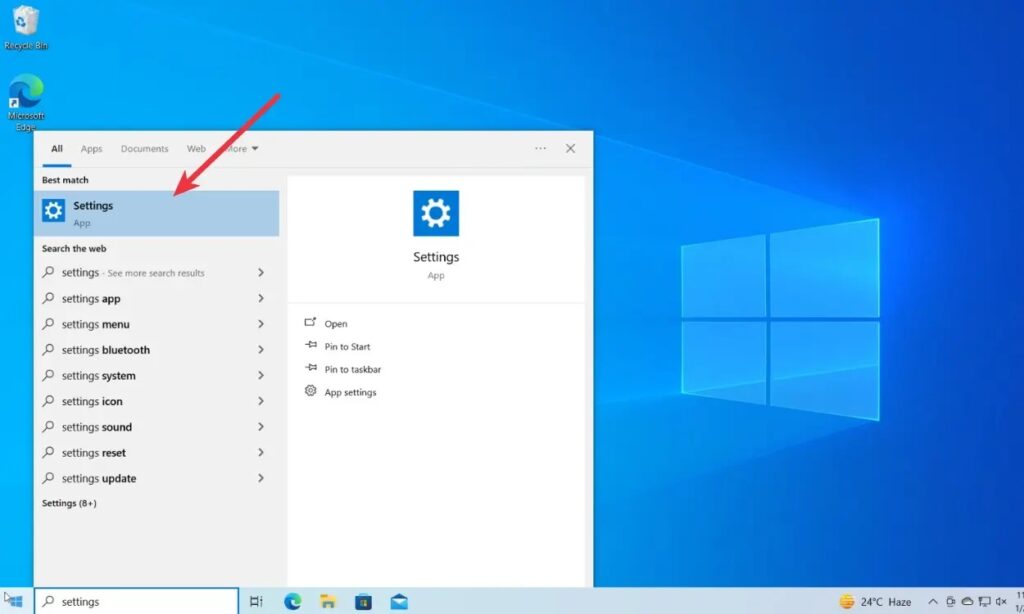
- Quickly open the Settings app by pressing the keyboard shortcut “Win+I”. Alternatively, you can open the Start menu -> search for “Settings” -> click on the first search result.
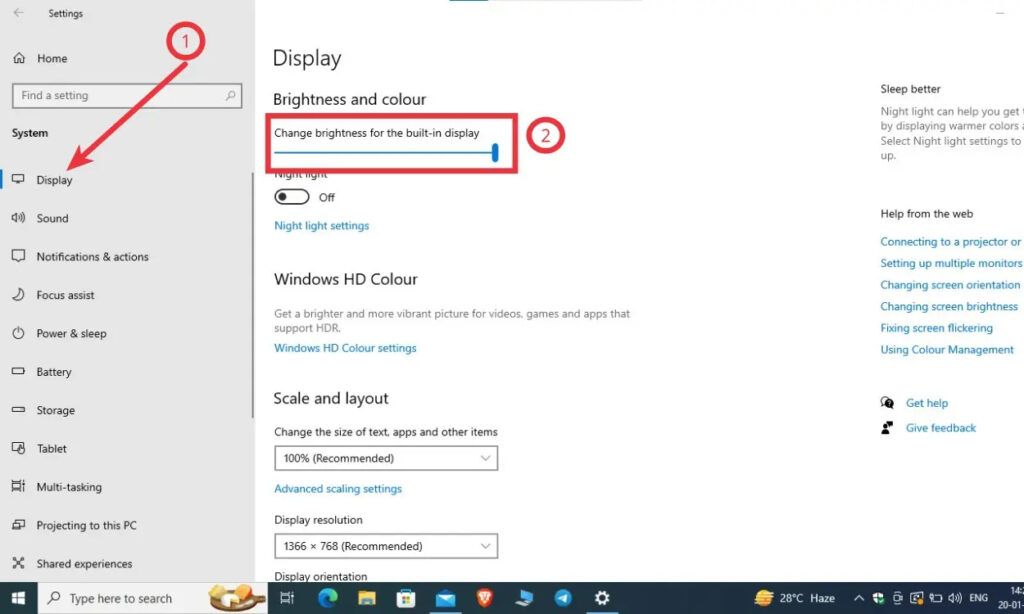
- Once the Settings app is open, navigate to System -> Display.
- Locate the brightness slider and move it left to decrease the brightness or right to increase it.
Please note that this method may not work if you’re using Windows on a desktop PC. In such cases, you’ll need to adjust the brightness directly on your monitor. We will detail how to do this in the following sections.
Method 2: Adjusting Brightness Using the Keyboard
Almost all laptops come equipped with dedicated buttons to adjust brightness. These functions are typically integrated into the F series of keys (such as F1, F2, or F11, F12) and can only be activated while pressing the Function key, usually located beside the Windows key. Here’s how you can adjust the brightness in Windows 10 using your keyboard:
- Locate the Function key (Fn) and the Brightness keys on your laptop’s keyboard.
- Press and hold the Function key (Fn).
- While holding the Function key, press the Brightness keys to lower or increase the brightness level of your display.
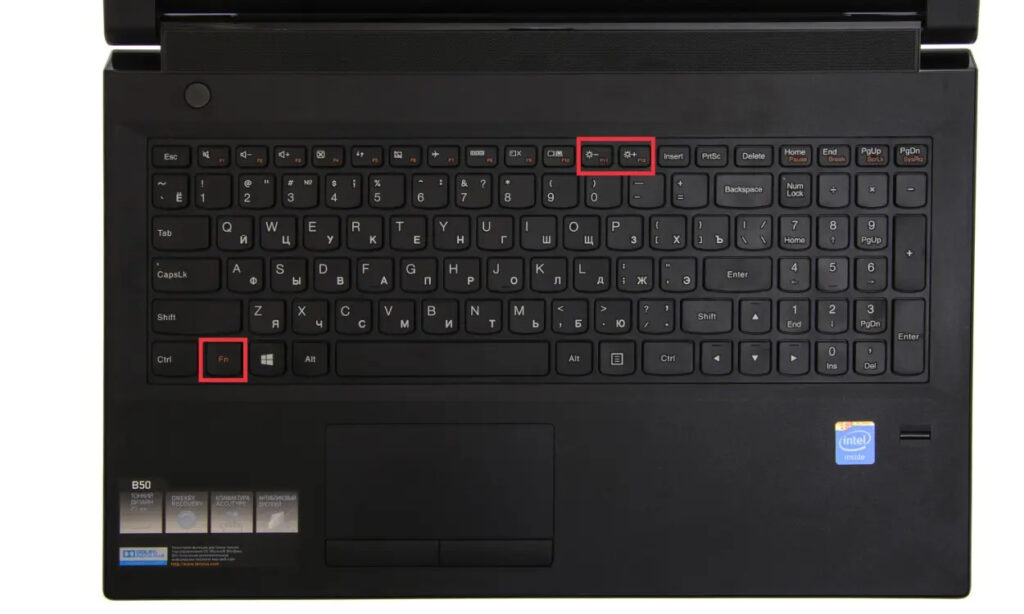
- Some older laptops may have dedicated brightness control keys, which you can directly press to adjust the brightness without needing to use the Function key.
Method 3: Changing Brightness from Action Center
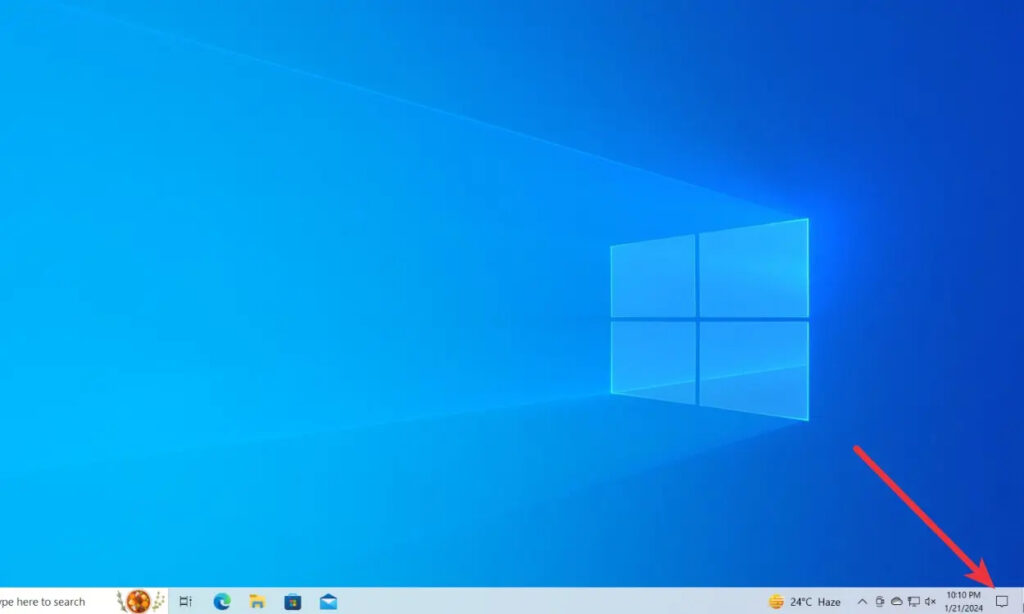
The Action Center in Windows 10 can be accessed by clicking on the message-like icon in the bottom-right corner of the Windows Taskbar. Once opened, you can adjust Windows 10’s brightness directly from there.
- Click on the Action Center icon located in the bottom-right corner of the Windows Taskbar. Alternatively, you can press the keyboard shortcut “Windows + A”.
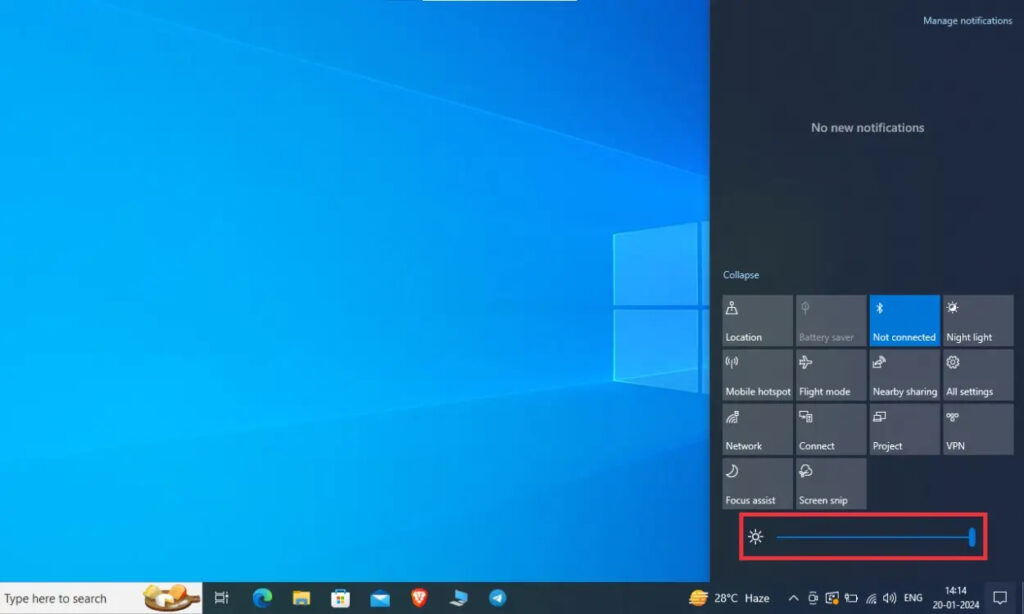
- Click on “Expand” to reveal additional options, if necessary.

- Drag the slider to the left or right to adjust the brightness on your Windows 10 machine.
Method 4: Adjusting Windows 10 Brightness on Monitor
If you use a desktop PC, you cannot change the brightness from Windows Settings. Instead, you’ll need to adjust your monitor’s brightness manually. There’s a handy app called Twinkle Tray that allows you to adjust the monitor brightness without using physical buttons. You can refer to our article on adjusting monitor brightness on Windows 11 and 10 using the Twinkle Tray app.

Additionally, you can utilize the joystick located on the back of the monitor to navigate the monitor settings menu. Some monitors also feature dedicated brightness buttons, typically located on the back or the bottom-right corner of the monitor. If you’re unsure about the location or functionality of these controls, it’s advisable to consult the monitor’s user manual.
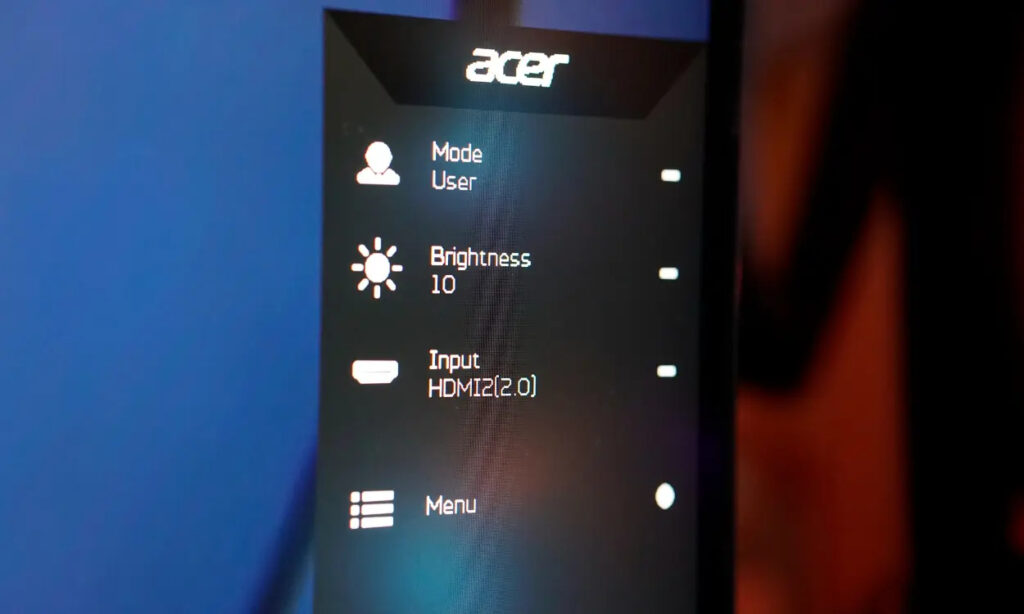
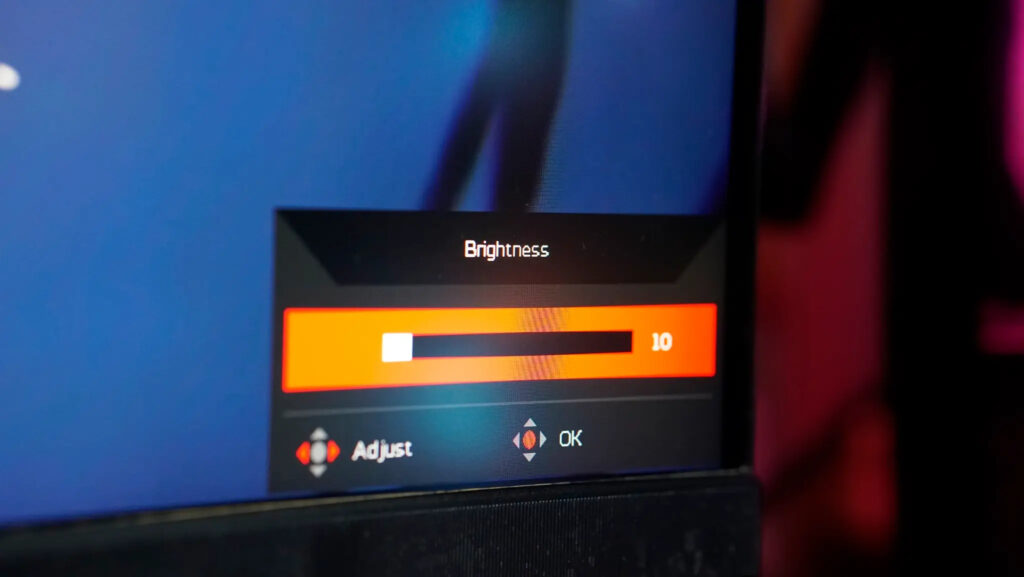
Once you’ve located the buttons or joystick, navigate to the “Brightness” section in the monitor settings menu and use the controls to adjust the brightness. Keep in mind that the layout and functionality of these controls may vary between different monitor models, so explore all areas of the menu to familiarize yourself with the options available.
Method 5: Adjusting Brightness Using Display Driver Software
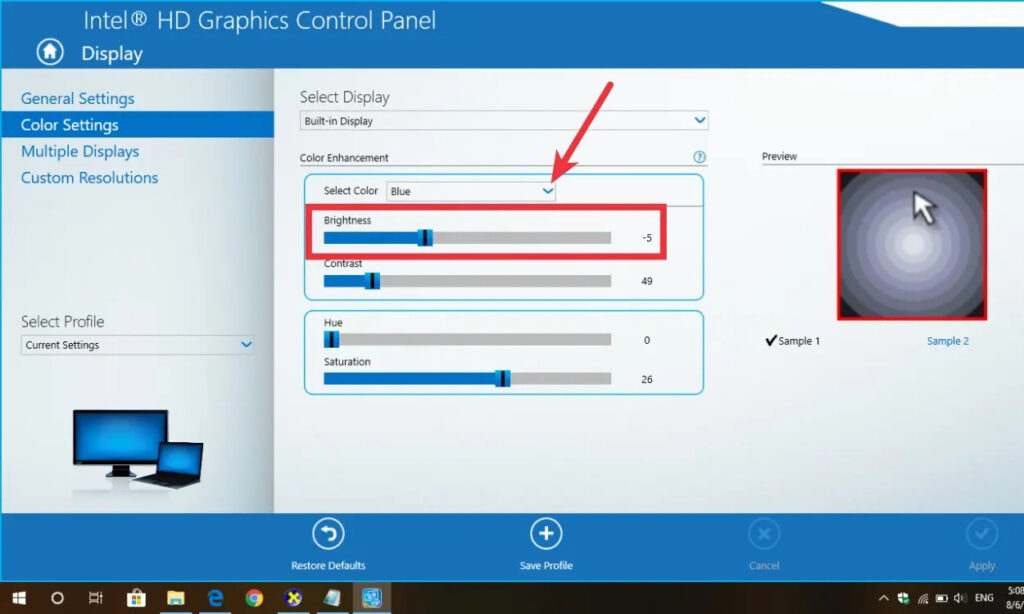
Depending on the CPU or GPU your laptop is equipped with, it may come with software designed for tuning graphics settings. This software can also be used to adjust display brightness on Windows 10. For instance, if your laptop has an Intel CPU and/or GPU, it will likely include the Intel Graphics Driver, which can be accessed from the applications menu.
- Open the Intel Graphics Settings software.
- Navigate to the “Color” section from the top bar.

- Select “all colors” from the dropdown menu “Select Color.”
- Proceed to adjust the brightness by dragging the slider to your desired level.
Method 6: Enabling Adaptive Brightness on Windows 10
Some Windows laptops are equipped with Adaptive Brightness support, a feature that utilizes the laptop’s light sensor to automatically adjust brightness according to ambient lighting conditions. While not every laptop includes this feature, premium models or business notebooks are more likely to have Adaptive Brightness functionality.
To verify this, navigate to Settings -> System -> Display. If you find a “Change brightness automatically when lighting changes” feature, toggle it on. This will enable your device to adjust brightness based on the surrounding lighting conditions.
These methods offer straightforward ways to adjust screen brightness on Windows 10. If you don’t see the brightness slider, it may be because of an outdated display driver. In such instances, updating drivers on Windows 10 can enable brightness adjustment. If you found this guide helpful, share your feedback in the comments section below.


