It can be incredibly frustrating when you’re unable to receive pictures on your iPhone, a problem that can arise unexpectedly for anyone, regardless of whether you’re using the latest iPhone 15 with the newest iOS 17 update. This issue typically occurs due to incorrect MMS settings, corrupted network settings, a poor internet connection, or glitches with your Apple ID. Let’s see how you can resolve this issue.
Method 1: Check Internet Connection
A weak internet connection is often the culprit behind your iPhone’s inability to receive or download picture messages. To check, try opening a website in Safari. If the site fails to load or you receive a message indicating that “Your iPhone isn’t connected to the internet,” then there’s likely an internet connectivity issue.
If you’re connected to Wi-Fi, you can try toggling the Wi-Fi option on your iPhone, forgetting and then reconnecting to the network, or restarting the Wi-Fi router. For Mobile Data, try toggling Airplane mode, toggling Mobile Data, checking your data plan, or contacting your network provider to inquire about any data-related issues.
Method 2: Verify MMS Settings
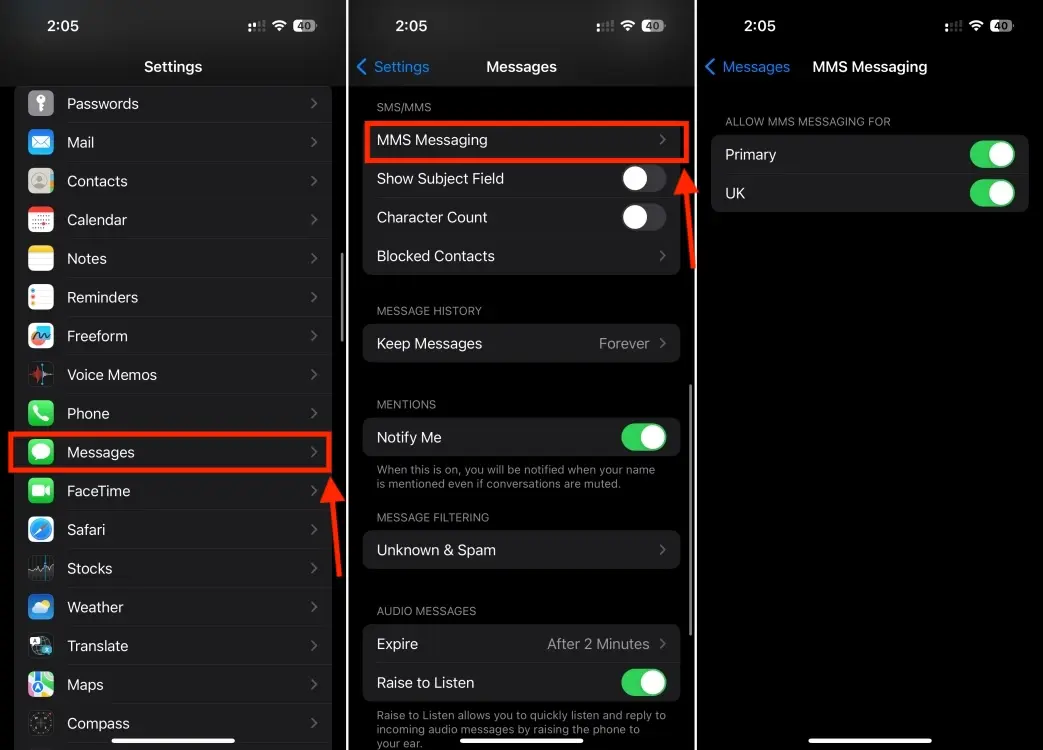
An iPhone also supports MMS, allowing you to send text messages and photos over a cellular network. This feature is useful when iMessage is unavailable or when you need to exchange media with Android users. However, there may be instances where you have disabled MMS on your iPhone, preventing you from sending or receiving pictures. To ensure that MMS is enabled, follow these steps:
1. Launch the Settings app and navigate to the Messages section.
2. Scroll down to locate the MMS Messaging option. If it’s disabled, toggle it on.
3. If you have dual SIM capabilities, tap on MMS Messaging and enable MMS for the preferred line. You can also enable MMS Messaging for both phone numbers if needed.

Method 3: Check AirDrop Settings
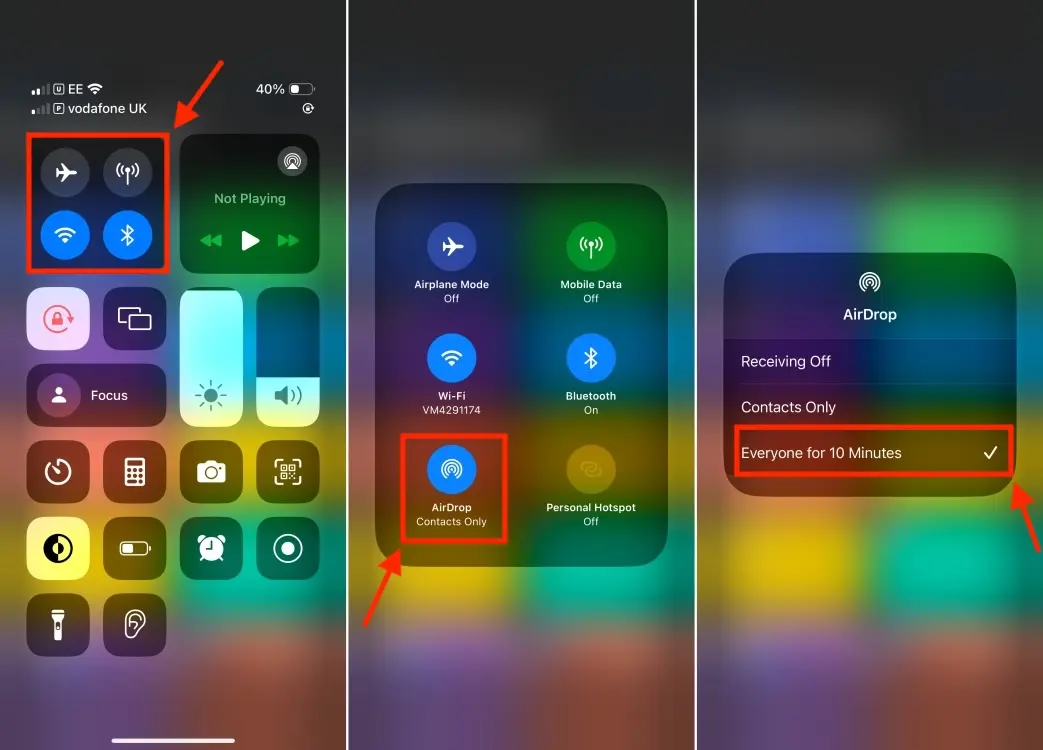
If you’re experiencing difficulties receiving pictures on your iPhone through AirDrop, it’s important to check your AirDrop settings. AirDrop provides three visibility levels for your device:
1. Receiving Off: Your iPhone will not receive files from any source.
2. Contacts Only: Only your contacts can identify you and share files with you.
3. Everyone for 10 Minutes: You can receive files from all nearby Apple devices for a limited time.
Ensure that you haven’t selected the “Receiving Off” option, as this will prevent you from receiving files via AirDrop. If your iPhone still can’t receive pictures via AirDrop, try switching to “Everyone for 10 Minutes” and see if this resolves the issue.
To do this, open the Control Center, press and hold in the area containing the Airplane mode, Bluetooth, and other icons. Then, tap on the AirDrop icon and select “Everyone for 10 Minutes.”

Method 4: Sign out from Messages and Sign Back In
If you’re not receiving picture messages on your iPhone, another step to try is signing out and back into the Apple ID associated with Messages. When you sign out of Messages, your messages will be deleted from your iPhone, but don’t worry—they will be re-downloaded as new when you sign back in to your Apple ID account.
Here’s how to do it:
1. Launch the Settings app and select Messages.
2. Tap on Send & Receive.
3. Tap on your Apple ID and then tap the Sign Out button.

4. Once signed out, tap on “Use your Apple ID for iMessage.”
5. Select “Sign In” and enter your Apple ID credentials.
Method 5: Reset Network Settings
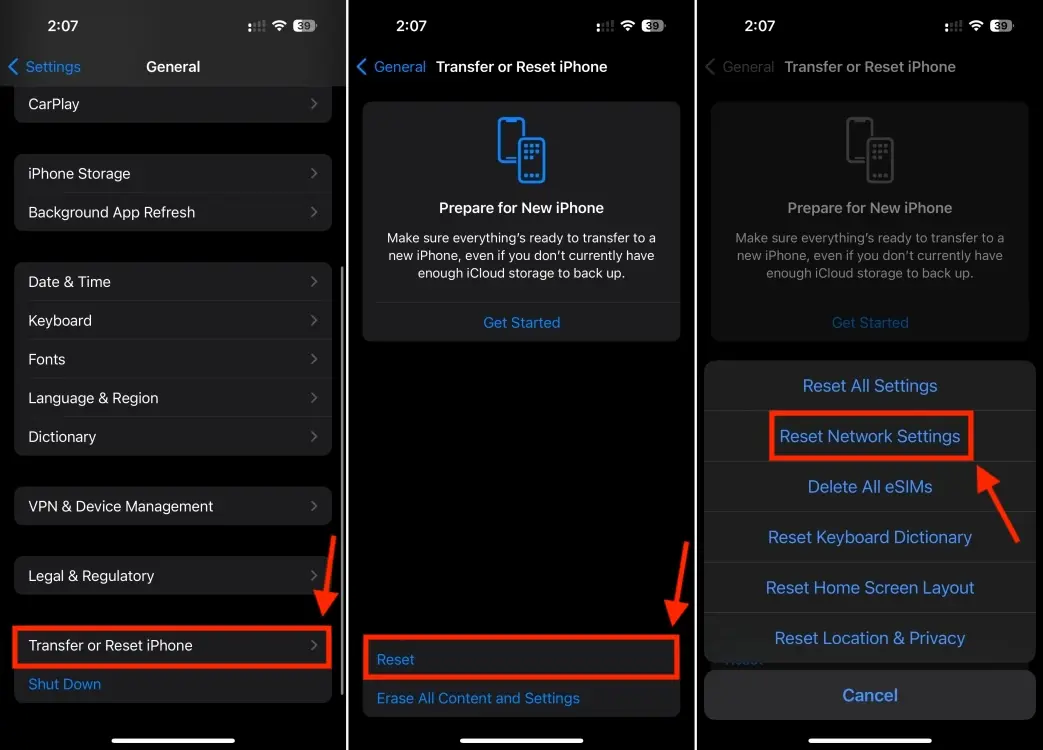
Incorrect or corrupted network settings can also cause pictures not to appear in text messages on your iPhone. Fortunately, you can reset the network settings to clear any network-related glitches on your iOS device.
To reset network settings on your iPhone, follow these steps: Navigate to Settings -> General -> Transfer or Reset iPhone -> Reset -> Reset Network Settings.

Here are some solutions to try if your iPhone isn’t receiving pictures. We hope this helps you receive Live Stickers, GIFs, pictures, and more in messages. If you’re still experiencing issues, the problem might be on the other person’s end. To prevent any issues, suggest that they follow the troubleshooting steps outlined above on their device.


0 Comments