
When you type in Google Docs, you’ll see white spaces around your document, known as margins. You can adjust these margins in Google Docs, which is useful for adhering to dissertation and assignment guidelines. Customizing margins can also make your document look neater. Here’s how to easily change margins in Google Docs:
Change Margins on Google Docs on Web Browser
The web version of Google Docs offers more features, including two ways to change margins. Here’s how:
01) Using the Ruler
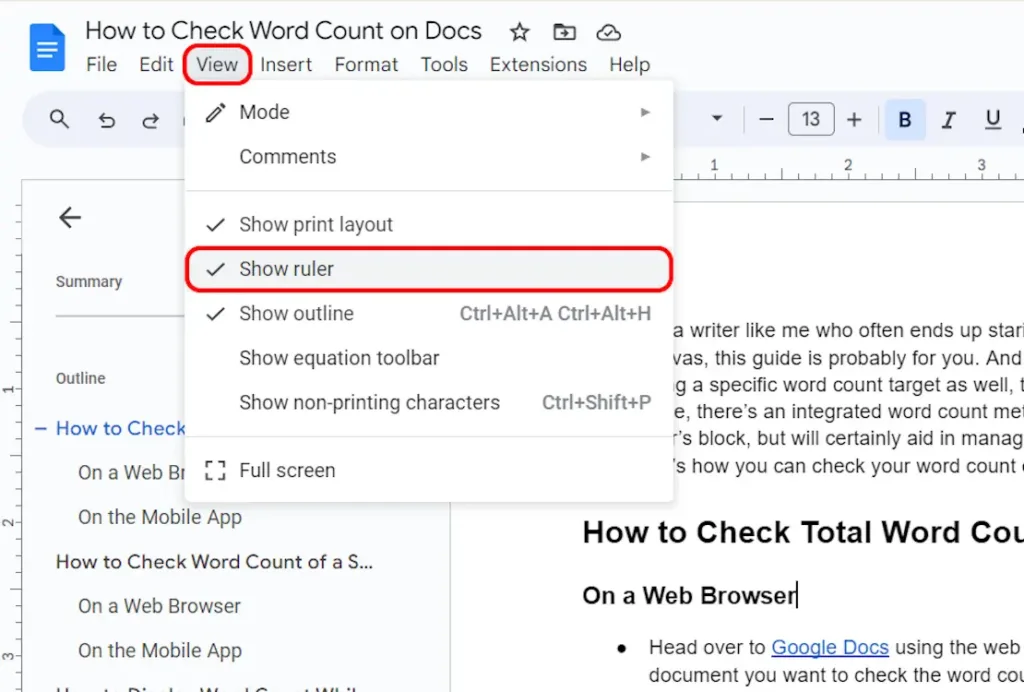
1. To adjust margins in a Google Docs document, go to the toolbar at the top and select the View panel. Ensure that “Show ruler” is checked to display the ruler around your document.
2. Locate the horizontal ruler at the top of your document. You’ll see two small blue down-facing arrows on each side.
3. Select the portion of your document you want to adjust the margins for, or select the entire document.
4. Drag the blue arrows left or right to adjust the margins as needed.

5. On the left side of your document, there is a vertical ruler. Move your cursor to the top of this ruler. When the cursor changes to a double-ended arrow, drag the ruler up or down to adjust the height of your document.
02) Using Page Setup
1. In your Google Docs document, click on “File” in the toolbar at the top, and then select “Page setup.”

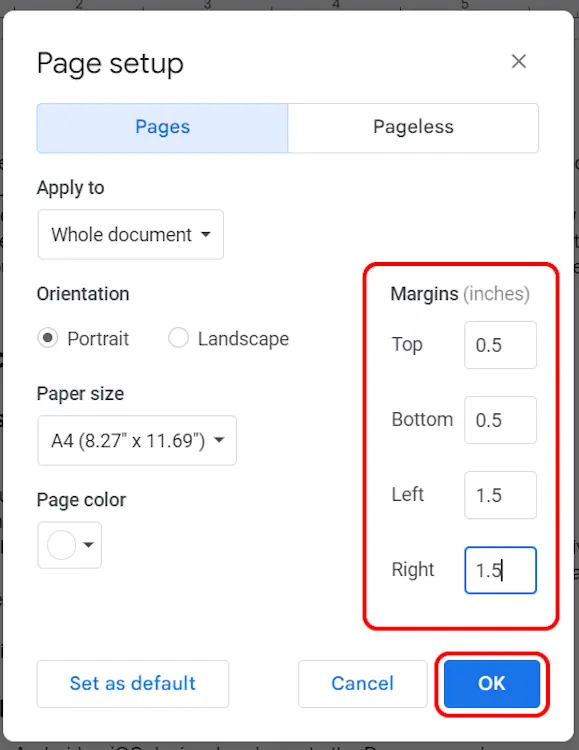
2. In the Page setup pop-up window, you’ll find options to specify margin values on the right. Enter your desired values. For example, you can set 0.5 inches for the top and bottom margins and 1.5 inches for the side margins.
3. You can also select the paper size, adjust the document’s orientation, set the page color, and more. Adjust these settings according to your preferences and click “OK.”
While using the ruler is straightforward, using the page setup offers more control. You can experiment with different values to see how your document aligns with the canvas. If you already have specific margin values, page type, etc., the page setup can expedite the process.
Change Margins on the Google Docs Mobile App
When using the dedicated mobile app for Google Docs, there are some differences between the iOS and Android versions. While the iOS app allows you to change margins, the Android app does not. However, on iOS, you cannot use the ruler and must use Page setup to make these changes. Here’s how:
1. Open the document in the Google Docs app for iOS. Double-tap anywhere in the document to enter edit mode, or tap on the edit icon at the bottom left corner.
2. Tap on the three-dot menu at the top right corner, then select “Page setup.”
3. In the Page setup page, locate the “Margins” setting and tap on it.

4. Choose from the “Narrow,” “Default,” or “Wide” templates.

5. Or select “Custom” to specify the margin values by tapping on the numbers shown on each side and adjusting them. After you finish, just tap on “Apply” button at the top right corner.
Now you know how to change margins on Google Docs using both a web browser and a mobile app. However, I recommend using the web browser for its convenience, especially for precise editing to avoid typing mishaps with larger fingers.
I hope this guide proves useful to you. Feel free to leave a comment below if you have any related queries!


0 Comments