When you’re sharing a special moment with a loved one over a FaceTime call, capturing it with a photo adds to the memory. Apple provides an excellent feature for this called FaceTime Live Photos, which not only captures images but also includes audio. To enable this feature, simply go to your settings and turn on FaceTime Live Photos. Once activated, you can effortlessly snap photos during your video calls. This guide will walk you through the steps and benefits of using FaceTime Live Photos. Let’s explore!
Requirements for Using FaceTime Live Photos
To snap photos during one-on-one FaceTime video calls, both you and the other participant must have one of the following devices:
- An iPhone running iOS 12.1.4 or later
- An iPad with iPadOS 13 or a later version
- A Mac running macOS 10.13.6 or macOS 10.14.4 or later
For group FaceTime calls, all participants need one of the following:
- An iPhone with iOS 13 or later installed
- An iPad with iPadOS 13 or later
- A Mac with macOS 10.15 or later installed
Enabling FaceTime Photos on iPhone and iPad
Additionally, ensure that Live Photos is enabled in the FaceTime settings for both you and the other participants.
Although it’s possible to capture screenshots during a FaceTime call, it’s considered impolite and inappropriate to do so without permission.
By default, the FaceTime Photos feature is enabled when FaceTime is activated. However, if you’re someone who frequently adjusts settings like myself, you may have disabled it intentionally or accidentally.
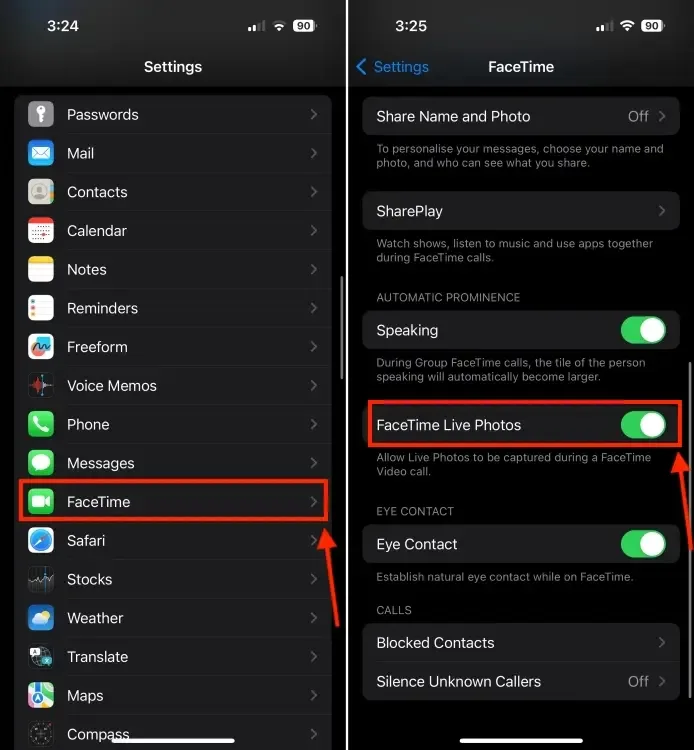
To enable FaceTime Photos on your iPhone or iPad, follow these steps:
- Open the Settings app.
- Scroll down and select FaceTime.
- Ensure that the FaceTime Live Photos toggle is switched on.

- Enabling this feature also grants others the ability to capture Live Photos of you.
Activating FaceTime Photos on Mac
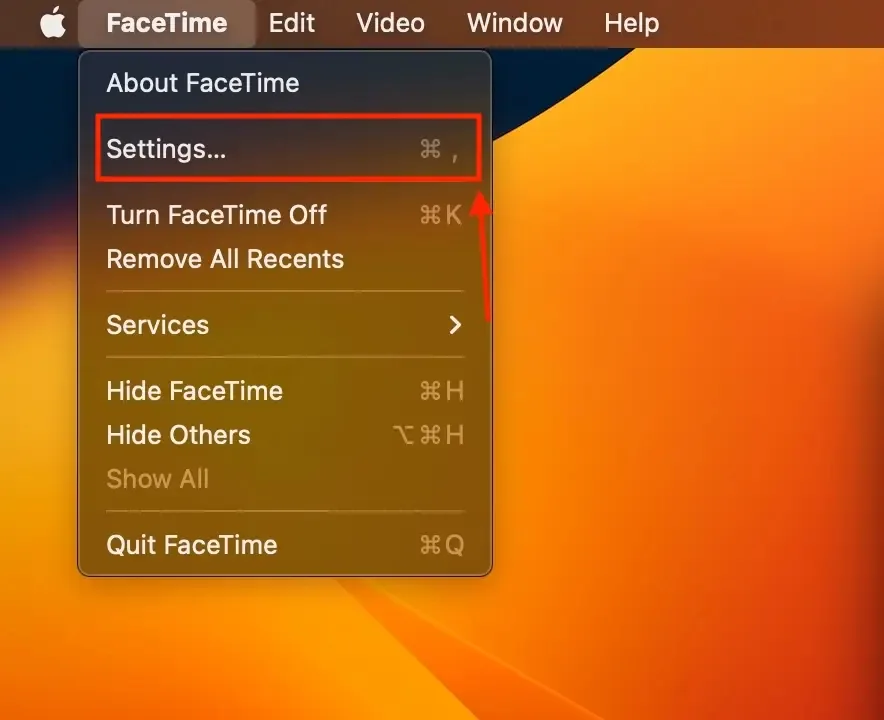
Enabling FaceTime photos on a Mac is as straightforward as it is on an iPhone or iPad. Just follow these steps:
- Open the FaceTime app on your Mac. You can find the FaceTime app icon in the Dock.
- Click on “FaceTime” from the menu bar at the top of the screen (where the small Apple logo is located), and then select “Settings…“

- Choose the setting “Allow Live Photos to be captured during video calls.”

- Ensure to do this beforehand, as the option is unavailable during a call.
Capturing Live Photos During FaceTime Calls
Now that you’ve enabled FaceTime Photos on your iPhone, iPad, or Mac, you can start capturing photos during a FaceTime video call .Nevertheless, there are a few crucial points to remember:
- Ensure the other person has enabled FaceTime Photos: Both parties must have this feature enabled to take photos during the call.
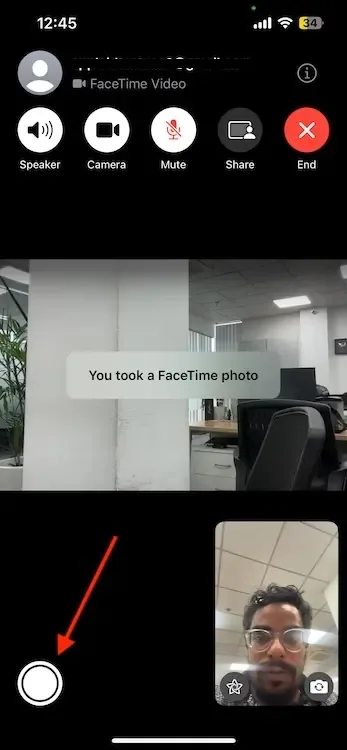
- Notifications for captured photos: When you take a photo during the video call, both you and the other participant will receive a notification.
- Availability may vary: FaceTime Photos may not be available in all countries and regions.
Once you’re aware of these considerations, you can easily capture photos during your FaceTime calls.
To take Live Photos during one-on-one FaceTime calls, simply press the Shutter button, which resembles two white circles nested within each other. This button becomes visible when you tap the screen of your iPhone or iPad during the call or when you choose the FaceTime window on a Mac.

To capture a photo during a Group FaceTime call on your iPhone, tap on the tile of the person you wish to capture, then tap the Fullscreen button to reveal the Shutter button. On a Mac, simply double-click on the person’s tile and click the Shutter button.
Taking FaceTime Photos Without Notifying the Other Party
When you take photos during a FaceTime call, the other participants receive a notification informing them of the picture taken. Currently, there’s no way to prevent this notification. However, you can opt to take a screenshot instead.
To capture a screenshot on an iPhone, press the Volume Up and Side button simultaneously. On a Mac, use Command + Shift + 5 and click on the FaceTime window to take the screenshot. There are also alternative methods to capture a screenshot on a Mac.
Nevertheless, Live Photos offer advantages over screenshots. They maintain transparency between participants and exclude the FaceTime interface, resulting in clearer images. Additionally, Live Photos preserve a few seconds of audio and video before and after capturing the photo.
Where FaceTime Photos Are Stored
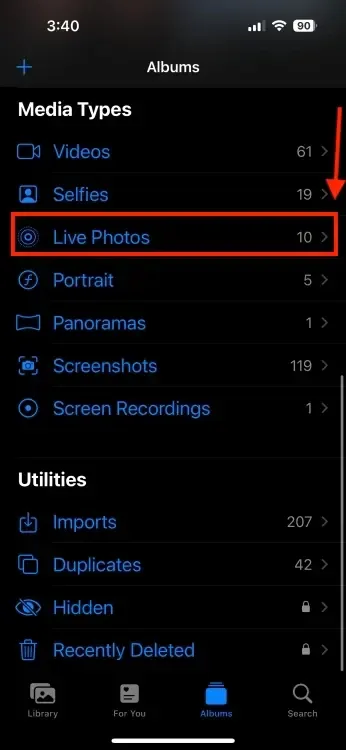
All the photos you capture during FaceTime calls, whether stills, screenshots, or Live Photos, are automatically saved in the Photos app. To access your FaceTime photos, open the Photos app on your iPhone or iPad and navigate to the Library tab at the bottom. Here, you’ll find all your photos. You have the option to browse through the library or scroll to the date when you captured the pictures.
If you specifically want to view your Live Photos, tap on “Albums” at the bottom, then scroll down and select the “Live Photos” album.

That’s how you can enable FaceTime Photos and capture memories during those special video calls. If you encounter any issues with FaceTime on your iPhone, we’ve also compiled 17 solutions to address the most common FaceTime-related problems.


